Содержание
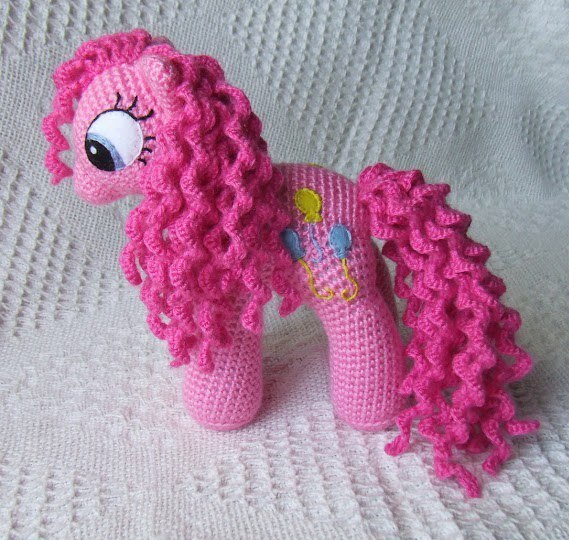
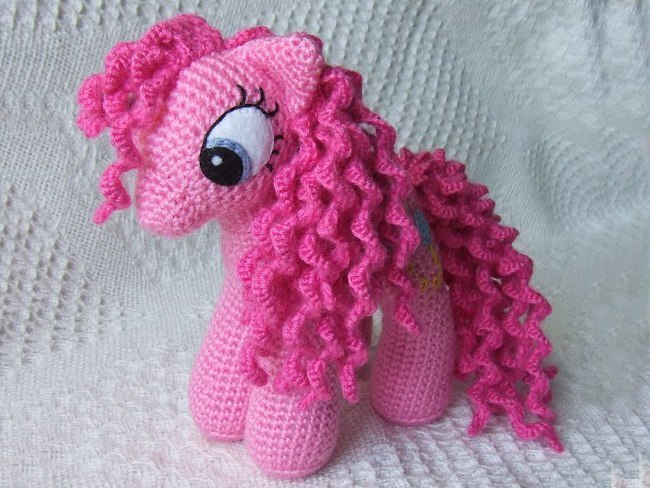
Предлагаем вам связать милую и озорную пони Пинки Пай. Чудесная, кудрявая и очень красивая пони.
Нам понадобится:
- светло-розовая и темно-розовая пряжа;
- крючок;
- наполнитель;
- фетр белый, голубой, черный для глазок, желтый и голубой — для воздушных шариков на задней
- лапке;
- игла и ножницы.
Сокращения:
СБН — столбик без накида
П — прибавка
У — убавка
ВП — воздушная петля
СС — соединительный столбик

ГОЛОВА
Наполнять по мере вязания.
1: 6СБН в кольцо амигуруми (6)
2: 6П (12)
3: (1СБН, 1П) – 6 раз (18)
4: (2СБН, 1П) – 6 раз (24)
5: 24СБН (24)
6: (3СБН, 1П) – 6 раз (30)
7: 30СБН (30)
8: (4СБН, 1П) – 6 раз (36)
9: 36БСН (36)
10: (5СБН, 1П) – 6 раз (42)
11-12: 42СБН (42)
13: (4СБН, 1У) – 6 раз (36)
14: 36СБН (36)
15: (3СБН, 1У) – 6 раз (30)
16: 30СБН (30)
17: (3СБН, 1У) – 6 раз (24)
18: 24СБН (24)
19: (2СБН, 1У) – 6 раз (18)
20: (1СБН, 1У) – 6 раз (12)
21: 6У (6)
Закончите вязание, оставив длинную нить. Стяните при помощи иглы отверстие.
ШЕЯ
Оставьте длинную нить в начале, которую потом используете для пришивания.
1: 21ВП, 1СС в первую петлю, чтобы сформировать круг (21)
2-3: 21СБН (21)
4: 16СБН, 1СС, повернуть
5: 12СС за заднюю стенку петли, повернуть
6: 1СС, 15СБН
7-8: 21СБН (21)
Закончите вязание, оставив длинную нить для пришивания. Широкую сторону шеи расположите спереди.
ТУЛОВИЩЕ
Наполняйте по мере вязания.
1: 6СБН в кольцо амигуруми (6)
2: 6П (12)
3: (1СБН, 1П) – 6 раз (18)
4: 18СБН (18)
5: (2СБН, 1П) – 6 раз (24)
6: 24СБН (24)
7: (3СБН, 1П) – 6 раз (30)
8: 30СБН (30)
9: (4СБН, 1П) – 6 раз (36)
10-23: 36БСН (36)
24: (4СБН, 1У) – 6 раз (30)
25: 30СБН (30)
26: (3СБН, 1У) – 6 раз (24)
27: 24СБН (24)
28: (2СБН, 1У) – 6 раз (18)
29: (1СБН, 1У) – 6 раз (12)
30: 6У (6)
Закончите вязание, стяните отверстие при помощи иглы.
НОС
1: 5СБН в кольцо амигуруми (5)
2: 5П (10)
3: 10СБН (10)
4: (1СБН, 1П) – 5 раз (15)
5-6: 15СБН (15)
Закончите вязание, оставив длинную нить для пришивания. Наполните деталь.
УШИ
1: 6СБН в кольцо амигуруми (6)
2: (1П, 1СБН) – 3 раза (9)
3: 9СБН (9)
4: (1П, 2СБН) – 3 раза (12)
5: 12СБН (12)
6: (1П, 3СБН) – 3 раза (15)
7: 15СБН (15)
8: (1П, 4СБН) – 3 раза (18)
Закончите вязание, оставив нить для пришивания.
ПЕРЕДНИЕ ЛАПЫ
Наполняйте по мере вязания.
1: 6СБН в кольцо амигуруми (6)
2: 6П (12)
3: (1СБН, 1П) – 6 раз (24)
4: 24СБН (24)
5: 24СБН за заднюю стенку петли (24)
6: 24СБН (24)
7: 1У, 22СБН (23)
8: 23СБН (23)
9: 1У, 21СБН (22)
10: 22СБН (22)
11: 1У, 20СБН (21)
12: 21СБН (21)
13: 1У, 19СБН (20)
14: 20СБН (20)
15: 1У, 18СБН (19)
16: 19СБН (19)
17: 1У, 17СБН (18)
18-23: 18СБН (18)
Закончите вязание, оставив нить для пришивания.
ЗАДНИЕ ЛАПЫ
Наполняйте по мере вязания.
1: 6СБН в кольцо амигуруми (6)
2: 6П (12)
3: (1СБН, 1П) – 6 раз (24)
4-5: 24СБН (24)
6: 24СБН за заднюю стенку петли (24)
7-8: 24СБН (24)
9: 1У, 22СБН (23)
10: 23СБН (23)
11: 1У, 21СБН (22)
12: 22СБН (22)
13: 1У, 20СБН (21)
14: 21СБН (21)
15: 1У, 19СБН (20)
16: 20СБН (20)
17: 1У, 18СБН (19)
18: 19СБН (19)
19: 1У, 17СБН (18)
20: 18СБН (18)
21: 6СБН, 3У за заднюю стенку петли, 6СБН (15)
22: 6СБН, 3П за переднюю стенку петли, 6СБН (18)
23: (1П, 5СБН) – 3 раза (21)
24: 21СБН (21)
25: (1П, 6СБН) – 3 раза (24)
26-27: 24СБН (24)
Закончите вязание, оставьте нить для пришивания.
Соберите все детали, сколите их булавочками и пришейте.
Затем сделайте кудряшки на гриву и хвост. Для этого наберите темно-розовой пряжей цепочку из ВП чуть длиннее, чем вам нужен волосок. Затем вяжите 3СБН в каждую петлю цепочку до конца. Закончите вязание и пришейте волосок к пони. Сделайте столько волосков, сколько вам нужно.
Из фетра вырежьте и оформите глазки, вышейте реснички.
Из фетра оформите рисунок на задней лапке.
Вот и все! Поздравляю, теперь у вас есть такая вот милая позитивная розовая пони амигуруми 🙂
Жми «Нравится» и получай только лучшие посты в Facebook ↓


Abbreviations used:
ch — chain
sc — single crochet
sc dec — single crochet decrease
bl sc — back loop single crochet
fl sc — front loop single crochet
sl st — slip stitch
bl sl st — back loop slip stitch
st (s) — stitch (es)
I used a 3mm hook and dk (light worsted) yarn, which makes ponies approximately 13 cm ( 5 inches) tall.
Head:
Stuff as you go.
Round 1) 6 sc in magic ring
Round 2) 2 sc in each sc around (12)
Round 3) (2 sc in next sc, sc in next sc) around (18)
Round 4) (2 sc in next sc, sc in next 2 sc) around (24)
Round 5) 1 sc in each sc around (24)
Round 6) (2 sc in next sc, sc in next 3 sc) around (30)
Round 7) 1 sc in each sc around (30)
Round 8) (2 sc in next sc, sc in next 4 sc) around (36)
Round 9) 1 sc in each sc around (36)
Round 10) 1 sc in each sc around (36)
Round 11) (sc dec in next 2 sc, sc in next 4 sc) around (30)
Round 12) 1 sc in each sc around (30)
Round 13) (sc dec in next 2 sc, sc in next 3 sc) around (24)
Round 14) 1 sc in each sc around (24)
Round 15) (sc dec in next 2 sc, sc in next 2 sc) around (18)
Round 16) (sc dec in next 2 sc, sc in next sc) around (12)
Round 17) (sc dec in next 2 sc) around (6)
Finish, leave tail for sewing.
Complete stuffing, sew remaining hole closed.
Neck:
Leave long tail for sewing
Round 1) Ch 17, sl st through first ch to form a ring
Round 2) 1 sc in each sc around (17)
Row 3) sc in next 12 sc, sl st in next sc, turn.
Row 4) (Do NOT ch 1, or skip the first st) bl sl st in next 9 sts, turn.
Row 5) (Do NOT ch 1, or skip the first st) sl st in next st, sc in next 12 sts
Round 6) 1 sc in each st around (17)
Round 7) 1 sl st in each of the next 4 sts.
Finish, leave long tail for sewing.
Body:
Stuff as you go.
Round 1) 6 sc in magic ring
Round 2) 2 sc in each sc around (12)
Round 3) (2 sc in next sc, sc in next sc) around (18)
Round 4) 1 sc in each sc around (18)
Round 5) (2 sc in next sc, sc in next 2 sc) around (24)
Round 6) 1 sc in each sc around (24)
Round 7) 1 sc in each sc around (24)
Round 8) 1 sc in each sc around (24)
Round 9) 1 sc in each sc around (24)
Round 10) 1 sc in each sc around (24)
Round 11) 1 sc in each sc around (24)
Round 12) 1 sc in each sc around (24)
Round 13) 1 sc in each sc around (24)
Round 14) 1 sc in each sc around (24)
Round 15) 1 sc in each sc around (24)
Round 16) 1 sc in each sc around (24)
Round 17) 1 sc in each sc around (24)
Round 18) 1 sc in each sc around (24)
Round 19) 1 sc in each sc around (24)
Round 20) (sc dec in next 2 sc, sc in next 2 sc) around (18)
Round 21) (sc dec in next 2 sc, sc in next sc) around (12)
Round 22) (sc dec in next 2 sc) around (6)
Finish, leave tail for sewing.
Complete stuffing, sew remaining hole closed.
Nose:
Round 1) 5 sc in magic ring
Round 2) [2 sc in next sc, sc in next sc] 2 times, 2 sc in next sc (8)
Round 3) 1 sc in each sc around (8)
Round 4) (2 sc in next sc, sc in next sc) around (12)
Round 5) 1 sc in each sc around (12)
Finish, leave long tail for sewing.
Ear (make 2):
Round 1) 5 sc in magic ring
Round 2) [2 sc in next sc, sc in next sc] 2 times, 2 sc in next sc (8)
Round 3) 1 sc in each sc around (8)
Round 4) [2 sc in next sc, sc in next 2 sc] 2 times, 2 sc in next sc, sc in next sc (11)
Round 5) 1 sc in each sc around (11)
Round 6) [2 sc in next sc, sc in next 3 sc] 2 times, 2 sc in next sc, sc in next 2 sc (14)
Round 7) 1 sc in each sc around (14)
Finish, leave long tail for sewing.
Foreleg (make 2):
Stuff as you go.
Round 1) 6 sc in magic ring
Round 2) 2 sc in each st around (12)
Round 3) (2 sc in each of next 2 sts, sc in next st) around (20)
Round 4) 1 sc in each st around (20)
Round 5) 1 bl sc in each st around (20)
Round 6) sc dec in next 2 sts, sc in next 18 sts (19)
Round 7) 1 sc in each st around (19)
Round 8) sc dec in next 2 sts, sc in next 17 sts (18)
Round 9) 1 sc in each st around (18)
Round 10) sc dec in next 2 sts, sc in next 16 sts (17)
Round 11) 1 sc in each st around (17)
Round 12) sc dec in next 2 sts, sc in next 15 sts (16)
Round 13) 1 sc in each st around (16)
Round 14) sc dec in next 2 sts, sc in next 14 sts (15)
Round 15) 1 sc in each st around (15)
Round 16) sc dec in next 2 sts, sc in next 13 sts (14)
Round 17) 1 sc in each st around (14)
Finish, leave long tail for sewing.
Hindleg (make 2):
Stuff as you go.
Round 1) 6 sc in magic ring
Round 2) 2 sc in each st around (12)
Round 3) (2 sc in each of the next 2 sts, sc in next st) around (20)
Round 4) 1 sc in each st around (20)
Round 5) 1 bl sc in each st around (20)
Round 6) sc dec in next 2 sts, sc in next 18 sts (19)
Round 7) 1 sc in each st around (19)
Round 8) sc dec in next 2 sts, sc in next 17 sts (18)
Round 9) 1 sc in each st around (18)
Round 10) sc dec in next 2 sts, sc in next 16 sts (17)
Round 11) 1 sc in each st around (17)
Round 12) sc dec in next 2 sts, sc in next 15 sts (16)
Round 13) 1 sc in each st around (16)
Round 14) sc dec in next 2 sts, sc in next 14 sts (15)
Round 15) sc in next 5 sts, [bl sc dec in next 2 sts] 2 times, sc in next 6 sts (13)
Round 16) sc in next 5 sts, [2 fl sc in next st] 2 times, sc in next 6 sts (15)
Round 17) (2 sc in next st, sc in next 4 sts) around (18)
Round 18) 1 sc in each st around (18)
Round 19) (2 sc in next st, sc in next 5 sts) around (21)
Round 20) 1 sc in each st around (21)
Finish, leave long tail for sewing.
Horn:
Round 1) 4 sc in magic ring
Round 2) 2 bl sc in next sc, bl sc in next 3 sc (5)
Round 3) [2 bl sc in next sc, bl sc in next sc] 2 times, bl sc in next sc around (7)
Round 4) 1 bl sc in each sc around (7)
Finish, leave long tail for sewing.
Closed Wing (make 2):
Very lightly stuff as you go.
Round 1) 4 sc in magic ring
Round 2) (2 sc in next sc, sc in next sc) around (6)
Round 3) (2 sc in next sc, sc in next sc) around (9)
Round 4) 1 sc in each sc around (9)
Round 5) (2 sc in next sc, sc in next 2 sc) around (12)
Round 6) 1 sc in each sc around (12)
Round 7) (2 sc in next sc, sc in next 3 sc) around (15)
Round 8) (2 sc in next sc, sc in next 4 sc) around (18)
Round 9) (sc dec in next 2 sc, sc in next 4 sc) around (15)
Round 10) (sc dec in next 2 sc, sc in next 3 sc) around (12)
Round 11) (sc dec in next 2 sc) around (6)
Finish, leave long tail for sewing.
Flatten into the correct shape. Round 1 is the tip of the wing, round 11 is the root.
Embroider feather pattern using slightly darker colour of yarn.
Feather 1 (make 2):
Round 1) 4 sc in magic ring
Round 2) (2 sc in next sc, sc in next sc) around (6)
Round 3) 1 sc in each sc around (6)
Round 4) 1 sc in each sc around (6)
Finish.
Feather 2 (make 2):
Round 1) 4 sc in magic ring
Round 2) (2 sc in next sc, sc in next sc) around (6)
Round 3) 1 sc in each sc around (6)
Round 4) 1 sc in each sc around (6)
Round 5) 1 sc in each sc around (6)
Round 6) 1 sc in each sc around (6)
Round 7) 1 sc in each sc around (6)
Finish.
Feather 3 & main wing (make 2):
Round 1) 4 sc in magic ring
Round 2) (2 sc in next sc, sc in next sc) around (6)
Round 3) 1 sc in each sc around (6)
Round 4) 1 sc in each sc around (6)
Round 5) 1 sc in each sc around (6)
Round 6) 1 sc in each of the next 2 sc; continuing on feather 2, 1 sc in each of the next 6 sc; back onto main wing, 1 sc in each of the next 2 sc, sc dec in next 2 sc. (11)
Round 7) 1 sc in each of the next 5 sc; continuing on feather 1, 1 sc in each of the next 6 sc; back onto main wing, 1 sc in each of the next 4 sc, sc dec in next 2 sc. (16)
Round 8) sc dec in next 2 sc, 1 sc in each of the next 12 sc, sc dec in next 2 sc. (14)
Round 9) sc dec in next 2 sc, 1 sc in each of the next 3 sc, [sc dec in next 2 sc] 2 times, 1 sc in each of the next 3 sc, sc dec in next 2 sc. (10)
Round 10) sc dec in next 2 sc, 1 sc in the next sc, [sc dec in next 2 sc] 2 times, 1 sc in the next sc, sc dec in next 2 sc. (6)
Finish, leave long tail for sewing.
Outer feather 1 (make 2):
Round 1) 4 sc in magic ring
Round 2) 1 sc in each sc around (4)
Finish.
Outer feather 2 & outer wing (make 2):
Round 1) 4 sc in magic ring
Round 2) (2 sc in next sc, sc in next sc) around (6)
Round 3) 1 sc in each sc around (6)
Round 4) 1 sc in each sc around (6)
Round 5) 1 sc in each of the next 3 sc; continuing on outer feather 1, 1 sc in each of the next 4 sc; back onto outer wing, 1 sc in each of the next 3 sc. (10)
Row 6) Put hook through one stitch from the front of the wing and one from the back together (skip stitch behind loop on hook, and skip one stitch at the other end). In this manner, 1 sc in each of the next 4 sc. ch1, turn. (4)
Row 7) [sc dec in next 2 sc] 2 times. (2)
Finish, leave long tail for sewing.
Do not stuff either the wings or the outer wings.
Sew rows 6 — 7 of the outer wings to the wings, feather 1 lowermost on both. Make sure they are on opposite sides — when the completed wings are attached to the pony, the outer wings should be on the outside on both sides.
Apple Bloom’s Hair Bow:
Leave long tail for sewing
Row 1) ch 3, turn.
Row 2) Skip 1st ch, 1 sc in each of the next 2 sts, ch 1, turn. (2)
Row 3) 1 sc in each of the next 2 sts, ch 1, turn. (2)
Row 4) 1 sc in each of the next 2 sts, ch 1, turn. (2)
Row 5) 1 sc in each of the next 2 sts, ch 1, turn. (2)
Row 6) 2 sc in each of the next 2 sts, ch 1, turn. (4)
Row 7) 1 sc in each of the next 4 sts, ch 1, turn. (4)
Row 8) 1 sc in each of the next 4 sts, ch 1, turn. (4)
Row 9) 2 sc in 1st st, 1 sc in each of the next 2 sts, 2 sc in next st, ch 1, turn. (6)
Row 10) 1 sc in each of the next 6 sts, ch 1, turn. (6)
Row 11) 2 sc in 1st st, 1 sc in each of the next 4 sts, 2 sc in next st, ch 1, turn. (8)
Row 12) 1 sc in each of the next 8 sts, ch 1, turn. (8)
Row 13) 1 sc in each of the next 8 sts, ch 1, turn. (8)
Row 14) 1 sc in each of the next 8 sts, ch 1, turn. (8)
Row 15) 1 sc in each of the next 8 sts, ch 1, turn. (8)
Row 16) 1 sc in each of the next 8 sts, ch 1, turn. (8)
Row 17) 1 sc in each of the next 8 sts, ch 1, turn. (8)
Row 18) 1 sc in each of the next 3 sts, sc dec in next 2 sts, 1 sc in each of the next 3 sts, ch 1, turn. (7)
Row 19) sc dec in 1st 2 sts, 1 sc in each of the next 3 sts, sc dec in next 2 sts, ch 1, turn. (5)
Row 20) 1 sc in each of the next 5 sts, ch 1, turn. (5)
Row 21) sc dec in 1st 2 sts, 1 sc in next st, sc dec in next 2 sts, ch 1, turn. (3)
Row 22) sc dec in 1st 2 sts, 1 sc in next st, ch 1, turn. (2)
Row 23) 1 sc in each of the next 2 sts, ch 1, turn. (2)
Row 24) sc dec in 1st 2 sts, ch 1, turn. (1)
Row 25) 1 sc in next st, ch 1, turn. (1)
Row 26) 1 sc in next st, ch 1, turn. (1)
Row 27) 1 sc in next st, ch 1, turn. (1)
Row 28) 1 sc in next st, ch 1, turn. (1)
Row 29) 1 sc in next st, ch 1, turn. (1)
Row 30) 1 sc in next st, ch 1, turn. (1)
Row 31) 2 sc in next st, ch 1, turn. (2)
Row 32) 1 sc in each of the next 2 sts, ch 1, turn. (2)
Row 33) 2 sc in 1st st, 1 sc in next st, ch 1, turn. (3)
Row 34) 2 sc in 1st st, 1 sc in next st, 2 sc in next st, ch 1, turn. (5)
Row 35) 1 sc in each of the next 5 sts, ch 1, turn. (5)
Row 36) 2 sc in 1st st, 1 sc in each of the next 3 sts, 2 sc in next st, ch 1, turn. (7)Row 37) 1 sc in each of the next 3 sts, 2 sc in the next st, 1 sc in each of the next 3 sts, ch 1, turn. (8)
Row 38) 1 sc in each of the next 8 sts, ch 1, turn. (8)
Row 39) 1 sc in each of the next 8 sts, ch 1, turn. (8)
Row 40) 1 sc in each of the next 8 sts, ch 1, turn. (8)
Row 41) 1 sc in each of the next 8 sts, ch 1, turn. (8)
Row 42) 1 sc in each of the next 8 sts, ch 1, turn. (8)
Row 43) 1 sc in each of the next 8 sts, ch 1, turn. (8)
Row 44) sc dec in 1st 2 sts, 1 sc in each of the next 4 sts, sc dec in next 2 sts, ch 1, turn. (6)
Row 45) 1 sc in each of the next 6 sts, ch 1, turn. (6)
Row 46) sc dec in 1st 2 sts, 1 sc in each of the next 2 sts, sc dec in next 2 sts, ch 1, turn. (4)
Row 47) 1 sc in each of the next 4 sts, ch 1, turn. (4)
Row 48) 1 sc in each of the next 4 sts, ch 1, turn. (4)
Row 49) sc dec in 1st 2 sts, sc dec in next 2 sts, ch 1, turn. (2)
Row 50) 1 sc in each of the next 2 sts, ch 1, turn. (2)
Row 51) 1 sc in each of the next 2 sts, ch 1, turn. (2)
Row 52) 1 sc in each of the next 2 sts, ch 1, turn. (2)
Row 53) 1 sc in each of the next 2 sts, ch 1. (2)
Row 54) sc along the edge, 1 st for every 2 rows, back to the starting row. Ch 1.
Row 55) 2 sl st along starting chain, ch 1.
Row 56) sc along other edge, 1 st for every 2 rows.
Finish.
Fold the ends down under the centre to make a bow shape. Sew ends in place.
(All the positions given are approximate — pin your pony together and experiment to see what looks best!)
Legs to body — place the line of decreases to the front of the legs. Tuck in 1-2 rows of the inner edges before sewing to prevent the legs from tilting outwards too far. Make sure the legs are firmly stuffed right to the top.
Front legs — front edges attached at the 5th round of the body, back edges at the 11th.
Back legs — place as far to the back as possible, so the curve of the upper back legs goes into the curve of the rump. Front edges should be attached at 14th round of the body, back edges at the 21th.
Neck to body — broadest side of the neck to the front. Attach the front edge of the neck at the 1st round of the body.
Nose to head — (You can put the head’s finishing point at the front or the back — it’ll be covered either by the nose or the mane. Choose whichever you think looks best!) Stuff the nose, sew to the front of the head, as far towards the bottom as possible.
Ears to head — Do not stuff ears, flatten, curve inwards, sew to back of head. Edges should be at the 5th rounds from the back of the head, the back of the ear should be at the 3rd round from the back of the head.
Neck to head — Stuff the neck before attaching the head.
Horn — Stuff before attaching. Place 3 rounds in front of the ears and an even distance between them.
Closed Wings — (I recommend attaching the wings AFTER the mane, tail and (if applicable) cutie mark) Attach the front half of the top edge of the wings only. Attach to the sides of the body towards the front, an equal distance between the neck and the tops of the front legs.
Open Wings — (I recommend attaching the wings AFTER the mane, tail and (if applicable) cutie mark) Attach rounds 8 — 10 of the main wings only. Attach to the sides of the body towards the front, an equal distance between the neck and the tops of the front legs.
Hair Bow — Place between the ears, a few rows back from the ear edges.
Eyes and (if applicable) Cutie Mark — I used felt and embroidery thread. If you prefer, you could also use fabric paint/pens.
Mane and Tail — I used thin cords made from yarn. Things to bear in mind before you try this: it takes ages to make the cords, and it takes ages to attach them. The other major disadvantage of using this technique is that you have to get the length of the cord correct before you attach it to your pony — you can’t cut them to length afterwards, buse the cords would just unravel.

Step 1: Make a loop in the center of a 60-inch cord. Make sure the left portion crosses over the right.

Step 2: Fold the end that is now on the right , and form a bight .Push it into the loop under — over (from below).

Pull on the left end to tighten the first loop around the bight. You can pull on the lower portion to create a small loop for a clasp (optional).

Step 3: Make a new bight with the left end, and pass it into the first one under — over (from below).
Pull firmly on the right end to tighten the first bight around the new one.
Reduce the size of the new bight by pulling on the left end.
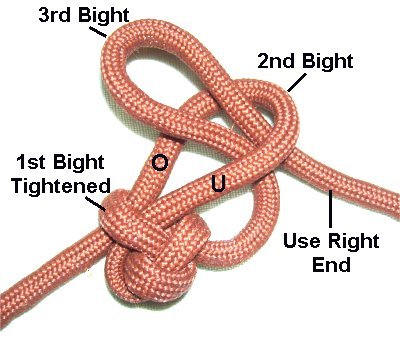
Step 4: Use the right end to make the third bight. Pass it into the second bight, under — over .
Pull on the left end to tighten the previous bight.

Step 5: Continue to alternate between the two ends to make the rest of the Zipper Sennit.
Finish by passing one end through the last bight made by the other end, rather than another bight.
Cut a length of yarn approximately 6 times the length you want your finished cord to be.
Tie a slip knot in the centre, so the ends are even.
Then you take the end that you DON’T pull on to tighten the loop, and draw a loop of it up through the loop of the slip knot. Then you pull the slip knot tight.
Then take the end you just used to pull the slip knot tight, pull a loop of that up through the loop you just created, then use the other end to pull that loop tight.
Keep repeating this, alternating which end you use to pull up a new loop, until your cord is long enough.
When you’re done, pull both ends entirely through the loop (you only need to pull one end through to secure the cord, but both gives you a neater end), and pull the loop tight. Do NOT cut the ends at this point!
Position your cord on your pony, and use a (curved, for preference) needle to draw ONE of the ends through the fabric of the pony, then knot the ends together using a reef knot.
Use a needle to draw BOTH ends back into the pony’s body. If you’re careful, you should be able to pull the knot through to the inside, so it’s hidden.
Всё о рукоделии

- Рукодельное царство
- >
- Игрушки
- >
- Пони Радуга Дэш крючком
 Симпатичные лошадки из мультика «Мой маленький пони» покорили сердца маленьких зрителей. И, конечно, каждый любитель поняшек хотел бы иметь игрушку (а лучше игрушкИ) в виде любимых персонажей. Мамы-рукодельницы вполне могут исполнить эту мечту.
Сегодня мы будем вязать героя мультсериала «My little pony» крючком. Основа всех подружек-пони одинакова. Т.е. Сумеречная Искорка, Рарити, Радуга Дэш, Эппл Джек, Флаттершай и Пинки Пай вяжутся по одному образцу (соответствующим цветом). А индивидуальность они получают при оформлении.

Я вязала Радугу Дэш (она же Рэйнбоу Дэш).
Моя Радуга свзана из пряжи ALIZE Burcum «Klasik» крючком №4. Получилась она высотой 35 см.
Я покажу фотографии процесса работы. Описание вязания основы я взяла на англоязычном сайте, здесь. Для тех, кто плохо понимает английский, даю подсказку: копируем текст описания и вставляем в гугл-переводчик. Перевод, конечно, не литературный, но понять можно. Для скачивания файла с описанием нужно нажать на фразу «free Ravelry download».
Расшифровка английских сокращений:
Ch — воздушная петля;
sl st — полустолбик без накида;
Sc — столбик без накида;
hdc — полустолбик с накидом;
dc — столбик с накидом;
flo – за переднюю стенку петки;
blo – за заднюю стенку петли;
magic ring – кольцо амигуруми.
Голова

Передние ноги


Туловище

Задние ноги

Соединение задних ног


Сборка
Пришиваем туловище к крупу и задним ногам.

Пришиваем передние ноги.


К голове пришиваем уши.

Вот такая основа пони у нас получается:

На основе безликой лошадки формируем личность каждой пони.
Глаза Рэйнбоу Дэш
Глазки состоят из овалов. Каждый овал вяжется по такому принципу:
1 ряд: воздушные петли.
2 ряд: на концах цепочки из воздушных петель — по 3 столбика без накида (это будут вершины овала); на остальных петлях – по 1 столбику без накида.
3 ряд: на 3 столбиках вершин овала – 3 прибавки; на остальных петлях – по 1 столбику без накида.
4 и последующие ряды: на прямых участках – по 1 столбику без накида; на 5 центральных петлях верхушек овала – прибавка, 1 стбн, прибавка, 1 стбн, прибавка.
На схеме это выглядит примерно так:

Вяжем столько рядов, сколько нужно для достижения необходимого размера овала.
Итак, для одного глаза вяжем овалы разных размеров (перечень в порядке убывания):
- белый (белок);
- бордовый (радужка);
- черный (зрачок);
- белый (блеск).
Первые 3 овала начинаем с 4 воздушных петель, последний – с 2.

Из овалов собираем глазик, вышиваем белой нитью второй блеск в глазах, пришиваем готовые глазки к голове.
Чёрной нитью вышиваем реснички. Синей нитью вышиваем ротик и ноздри.

Кьютимарка Рэйнбоу Дэш
У Радуги отличительная метка в виде облачка и радужной молнии.
Белой нитью вяжем облачко:
— набираем 6 воздушных петель, в 4ую от крючка петлю провязываем 4 столбика с накидом и 1 полустолбик с накидом;
— в следующую петлю — 1 полустолбик с накидом, 3 столбика с накидом, 1 полустолбик с накидом;
— в последнюю петлю — 1 полустолбик с накидом, 5 столбиов с накидом, 1 полустолбик с накидом;
— поворачиваем вязание, в предыдущую петлю (она получается средней) — 1 полустолбик с накидом, 3 столбика с накидом, 1 полустолбик с накидом;
— соединяем с первым веерком, нить обрезаем.
Красной, жёлтой и синей нитью вышиваем на боку крупа Радуги цветную молнию. Пришиваем облачко.

Грива и хвост
Я решила сделать волосы Радуги из тонких ленточек (0,3 см).
Нарезаем ленточки в два раза длиннее необходимой длины. Складываем пополам и пришиваем к голове и шее. Для удобства я сначала приколола ленточки булавками.

Хвостовые ленточки собираем ниткой в пучок и пришиваем на место.
В результате у нас получилась красотка Радуга Дэш!


